How to automate PDF watermarking with a REST API
Manually stamping PDFs works until the day it doesn't: someone skips the step under deadline, the stamped name is last quarter's customer, or the "watermarked" copy turns out to be the original with a logo on it. Automating watermarking through an API fixes the reliability problem — but the bigger win is a different kind of watermark. This guide walks through automating reader-identity watermarks with the MyPass DRM REST API: what changes versus stamping files, the integration flow, and what to check before you build.
Stamped files versus view-time watermarks
Most watermarking automation advice assumes you'll generate a separate stamped file per recipient: render the PDF, burn in a name, store and send that copy. It works, but it scales badly — a 200-reader distribution is 200 files — and the mark is frozen at generation time, in a file that can still be forwarded freely.
A DRM-based approach inverts this. You protect the document once, attach a watermark policy, and the reader's identity is rendered onto the view each time the document is opened. One document serves every reader; each of them sees a copy visibly tied to their own name; and because the watermark is part of a policy rather than the file, it rides along with expiry, device limits and revocation. The dynamic watermarking feature page covers what the mark itself looks like — this guide covers wiring it up.
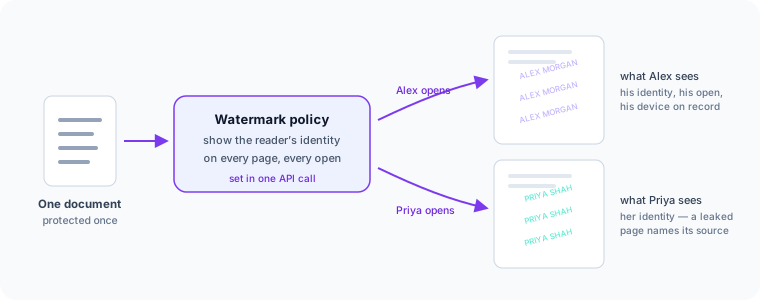
The integration flow
The automation is three steps, and only the first is new code:
- 1. Protect with a watermark policy. Call
POST /api/v1/docs/protectwhere documents enter your system — an export pipeline, an upload handler, a report generator. The policy attached here turns on the reader-identity watermark (and anything else the document needs: expiry, device limits, print and copy permissions). - 2. Grant access to named readers. When your platform decides someone should have the document — a purchase, an enrollment, a deal-room invitation — grant access to that person. The identity you grant is the identity the watermark shows — nothing separate gets generated for each reader.
- 3. Let the viewer do the rest. When the reader opens the document, the protected viewer checks the policy and renders the view with their identity on it. Open events land in the audit log (
GET /api/v1/audit) so you can confirm the distribution actually happened.
Revocation completes the loop: POST /api/v1/activations/{id}/revoke ends a reader's access after delivery — something no stamped file, however well watermarked, can do. If you're automating more of the lifecycle than watermarking, the companion guide to API-driven document security workflows covers grant-and-revoke symmetry, expiry by rule, and audit export.
What to check before you build
- Formats. PDFs are protected natively; common Office formats are converted on protection. The supported formats page has the current list.
- What the watermark shows. The authorized reader's identity, rendered visibly on the view. Be skeptical of vendors promising watermarks that "block screenshots" — no watermark does; its real job is making any capture attributable to a person.
- Where the identity comes from. Your system supplies it at grant time, so the mark is only as accurate as your reader records — one more reason to wire granting to the system of record rather than a manual list.
- Plan requirements. None to start: the API, including watermark policies, is available on every plan including Free, so the integration can be proven end to end before any commitment.
Trying it
The fastest path is manual-first: protect one document with a watermark policy in the workspace, open it as two different test readers, and confirm each view carries the right identity. Then move the same protect call into your pipeline. The developer overview and the OpenAPI reference (opens in a new tab) cover authentication and the full request schemas.